Prepare to embark on a delightful culinary journey to the heart of the Middle East, where a dessert unlike any other awaits: Knafeh. This iconic sweet cheese pastry, often hailed as the king of Middle Eastern sweets, might initially seem a curious concept to those unaccustomed to cheese in desserts beyond a classic cheesecake. However, much like a first taste of baklava, one bite of this mesmerizing creation often turns initial skepticism into sheer adoration. Its golden, crisp exterior, gooey, stretchy cheese filling, and fragrant sweet syrup create an unforgettable symphony of textures and flavors. And the best part? Crafting authentic, easy knafeh kunafa at home is far simpler than you might imagine.
What Exactly is Knafeh? A Middle Eastern Sweet Revelation
Knafeh, known by a myriad of spellings including kunafa, kanafeh, kunafeh, and konafi, is a traditional Middle Eastern pastry dessert that boasts a rich history and an even richer taste. At its core, it's a sublime combination of three main components:
- Shredded Phyllo Pastry (Kataifi): These fine, hair-like strands of dough, also known as kataifi dough, form the crispy golden crust that encases the delicious filling. Some variations might use fine semolina dough, but kataifi provides that signature crunchy texture.
- Stretchy Cheese Filling: This is the soul of knafeh. Unlike savory cheese dishes, the cheese used here is typically mild, semi-sweet, and becomes incredibly melty and stretchy when baked.
- Scented Sugar Syrup (Ater): A simple syrup, often delicately infused with rose water or orange blossom water, is poured over the hot pastry, drenching it in sweet, aromatic bliss.
While variations of knafeh are found across the Levant, Turkey, and Greece, this particular guide focuses on the "kunafa khishna" style – characterized by its shredded phyllo topping rather than semolina, and a pure cheese filling, free from milk or semolina pudding. The result is an easy knafeh kunafa that is ooey-gooey, sweet, crunchy, and utterly delightful.
Why This Easy Knafeh Kunafa Recipe Will Become Your Favorite
Many perceive knafeh as an intimidating dessert, reserved for skilled pastry chefs or specialty bakeries. However, this misconception couldn't be further from the truth. What we've discovered, and what we'll share with you, is that making a truly authentic and delicious easy knafeh kunafa at home is surprisingly straightforward. The beauty of this recipe lies in its simplicity:
- Simple Syrup Preparation: The fragrant syrup comes together in mere minutes on the stovetop.
- Dough Preparation: Thawing and gently shredding the kataifi dough is quick and easy.
- Layering and Assembly: A few swift steps to layer the dough and cheese in your pan.
- Baking: The oven does most of the work, transforming the layers into a golden masterpiece.
With just about 15-20 minutes of active prep time (even less if your syrup is made in advance), you'll be on your way to enjoying a dessert that looks incredibly impressive and tastes heavenly. The ultimate reward? That spectacular cheese pull when you slice into it, still warm, promising a mouthful of sweet, crispy, and creamy perfection.
Essential Ingredients for Your Authentic Knafeh
Creating the perfect easy knafeh kunafa starts with understanding its core components. While traditional ingredients are often specific to the Middle East, we'll guide you through accessible alternatives that deliver outstanding results.
1. Kataifi (Shredded Phyllo) Dough
- What it is: These fine, noodle-like strands of dough are key to knafeh's iconic crispy texture. You'll typically find it in the freezer section of Middle Eastern grocery stores or larger supermarkets.
- Preparation: If frozen, ensure it's completely thawed before using. Gently separate the strands and break them into smaller pieces to make them easier to work with and ensure even coating.
- Pro Tip: Work quickly once the kataifi is out of the package, as it can dry out. If needed, cover it with a damp cloth.
2. The Cheese Filling
The choice of cheese is crucial for that signature stretchy, mild flavor. Traditionally, Akkawi or Nabulsi cheese is used. These are brine-cured cheeses that require desalting by soaking them in water for several hours, changing the water multiple times. For an easy knafeh kunafa recipe, we recommend more readily available options:
- Low-Moisture Mozzarella: This is an excellent substitute, providing the desired stretch without being too salty or watery. Shred it finely.
- Ricotta Cheese: While not traditionally used for the stretch, full-fat ricotta can be mixed with mozzarella to add a creamy, slightly sweet dimension. It won't give the same "pull" on its own, but it complements mozzarella beautifully. Ensure it's well-drained to prevent a soggy pastry.
- Sweetened Cream Cheese Mixture: For a less traditional but still delightful version, some recipes use a mixture of cream cheese, ricotta, and a touch of sugar. This offers a different, but equally delicious, creamy texture.
- Our Recommendation for Easy & Authentic: A combination of shredded low-moisture mozzarella with a small amount of ricotta (well-drained) often yields the best balance of stretch and creaminess for home cooks.
3. Butter or Ghee
Unsalted butter or clarified butter (ghee) is essential for achieving that beautiful golden-brown, crispy crust. It coats the kataifi strands, preventing them from drying out and imparting a rich flavor.
- Ghee: Offers a richer, nuttier flavor profile often preferred in traditional Middle Eastern cooking.
- Unsalted Butter: A perfectly acceptable and accessible alternative. Melt it gently before mixing with the kataifi.
4. Simple Sugar Syrup (Ater or Sharbat)
This sweet, aromatic elixir is what transforms the baked pastry into a true dessert. It's incredibly simple to make:
- Sugar and Water: The basic foundation. The ratio can be adjusted slightly to control sweetness.
- Lemon Juice: A splash of lemon juice prevents the syrup from crystallizing and adds a touch of brightness to balance the sweetness.
- Rose Water or Orange Blossom Water: These floral essences are optional but highly recommended for that authentic Middle Eastern aroma. A little goes a long way!
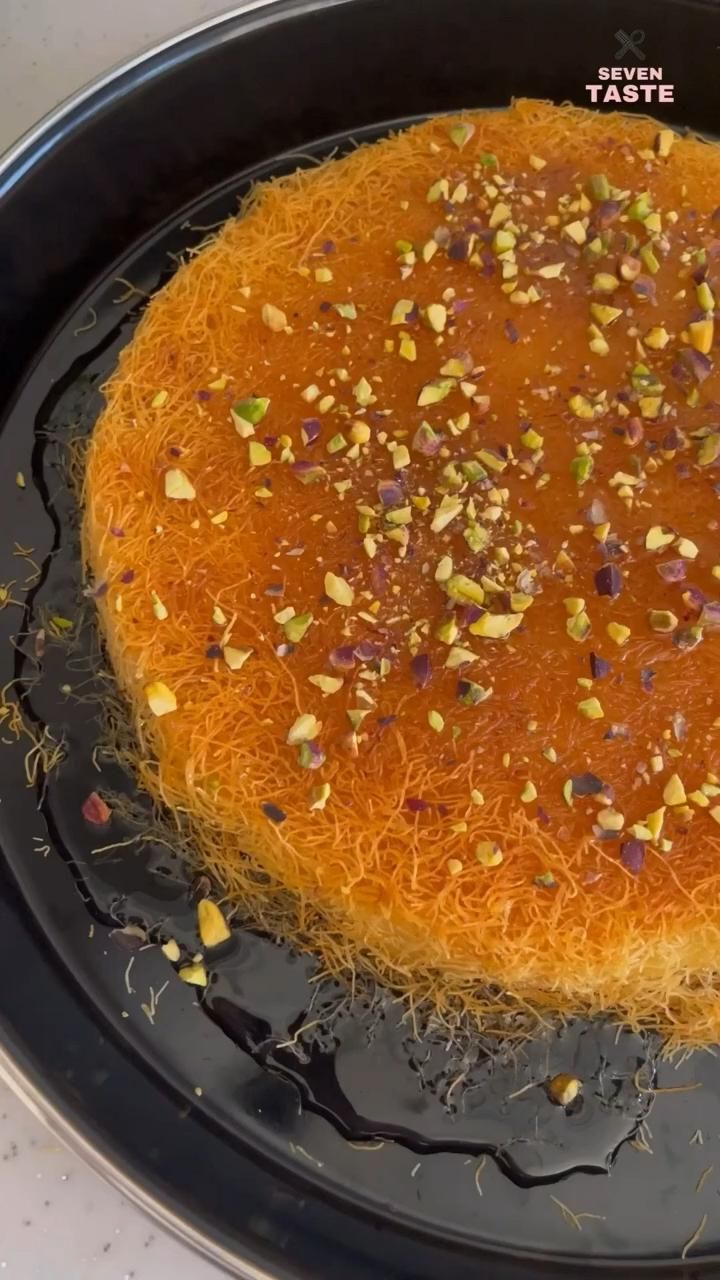
5. Garnish: Crushed Pistachios
Finely crushed pistachios not only add a vibrant pop of color but also contribute a delightful crunch and a subtle nutty flavor that perfectly complements the sweet and creamy knafeh.
Step-by-Step Guide to Making Easy Knafeh Kunafa
Follow these simple steps to bring this magnificent dessert to life in your own kitchen:
Step 1: Prepare the Aromatic Simple Syrup
In a small saucepan, combine sugar and water. Bring to a boil over medium heat, stirring until the sugar dissolves. Reduce heat and simmer for 5-7 minutes until slightly thickened. Remove from heat and stir in the lemon juice and rose or orange blossom water. Set aside to cool to room temperature; the syrup should be warm, not piping hot, when poured over the knafeh.
Step 2: Prepare the Kataifi Dough
If using frozen kataifi, thaw it completely. Gently pull apart the strands and chop or shred them into smaller, manageable pieces (about 1-2 inches long). In a large bowl, melt the butter or ghee. Add the shredded kataifi and toss thoroughly with your hands, ensuring every strand is coated evenly with butter. This is crucial for crispiness and color.
Step 3: Prepare the Cheese Filling
If using Akkawi or Nabulsi cheese, desalinate it as instructed. For mozzarella and ricotta, shred the mozzarella and thoroughly drain the ricotta by pressing it between paper towels or in a fine-mesh sieve. Mix the cheeses together.
Step 4: Assemble Your Knafeh
Preheat your oven to 375°F (190°C). Lightly grease a round baking pan (traditionally 9-10 inches). Press half of the butter-coated kataifi dough evenly onto the bottom of the pan, extending slightly up the sides. Press firmly to create a compact base. Distribute the cheese filling evenly over the kataifi layer, leaving a small border around the edge. Top with the remaining kataifi dough, pressing gently but firmly to ensure the cheese is fully covered and the layers are compact.
Step 5: Bake to Golden Perfection
Bake for 30-40 minutes, or until the top and sides are deeply golden brown and crispy. Keep a close eye on it during the last 10-15 minutes to prevent burning.
Step 6: Syrup and Serve!
Once removed from the oven, immediately and generously pour the cooled simple syrup evenly over the hot knafeh. The pastry will sizzle as it absorbs the sweet liquid. Let it sit for 5-10 minutes to allow the syrup to fully soak in. Invert the knafeh onto a serving platter (optional, but gives a beautiful presentation with the bottom crust on top) or slice it directly in the pan. Garnish with plenty of crushed pistachios. Serve warm to enjoy the ultimate cheese pull and crispy-sweet experience.
Expert Tips for Knafeh Perfection
- Don't Skimp on Butter: The butter is essential for a truly golden and crispy crust. Ensure every strand of kataifi is coated.
- Press Firmly: Compacting the kataifi layers, especially the bottom, prevents crumbling and helps create an even crust.
- Warm Knafeh, Cool Syrup: Pouring cool or room temperature syrup over hot knafeh helps it absorb better without making the pastry soggy.
- Adjust Sweetness: Feel free to adjust the amount of syrup poured to your preference. Start with less, and add more if desired.
- Serve Immediately: While delicious cooled, knafeh is at its absolute best served warm, allowing the cheese to be perfectly stretchy and the pastry at its crispiest.
- Storage: Leftover knafeh can be stored covered at room temperature for a day, or refrigerated for up to 3-4 days. Reheat gently in the oven to restore some crispness.
Making easy knafeh kunafa at home is a rewarding experience that brings a piece of Middle Eastern culinary magic to your table. The joy of pulling apart a slice of this sweet, crispy, and gooey pastry, seeing the cheese stretch invitingly, is truly unmatched. It's a dessert that transcends cultural boundaries, delighting everyone who tries it. So, gather your ingredients, follow these simple steps, and prepare to unlock the authentic flavors of this beloved sweet cheese pastry. Your taste buds will thank you!
