Homemade Knafeh in Minutes: Simple Phyllo & Gooey Cheese Dessert
Imagine a dessert that combines the satisfying crunch of golden, buttery pastry with an unbelievably gooey, stretchy cheese filling, all drenched in a delicate, aromatic sweet syrup. Sound complex? What if we told you that this show-stopping Middle Eastern delicacy, Knafeh (also widely known as Kunafa), is surprisingly simple to make right in your own kitchen? Forget the fear of intricate techniques; this guide to easy knafeh kunafa will turn you into a dessert hero, proving that authentic flavors don't have to mean hours of work.
For those accustomed to cheese primarily in savory dishes or familiar only with cheesecakes, the idea of cheese as the star of a sweet, warm pastry might seem utterly foreign. However, a single bite of Knafeh is often enough to convert even the most skeptical palate. The initial wariness quickly melts away, replaced by an expression of pure delight as the unique harmony of textures and flavors unfolds. This isn't just a dessert; it's an experience, and it's one we're making incredibly accessible for you today.
What is Knafeh, Anyway? A Sweet Symphony of Textures
Knafeh, a name that dances across various spellings like kunafa, kanafeh, kunafeh, and konafi, is a cherished traditional Middle Eastern pastry. At its heart, it's a sublime combination of elements:
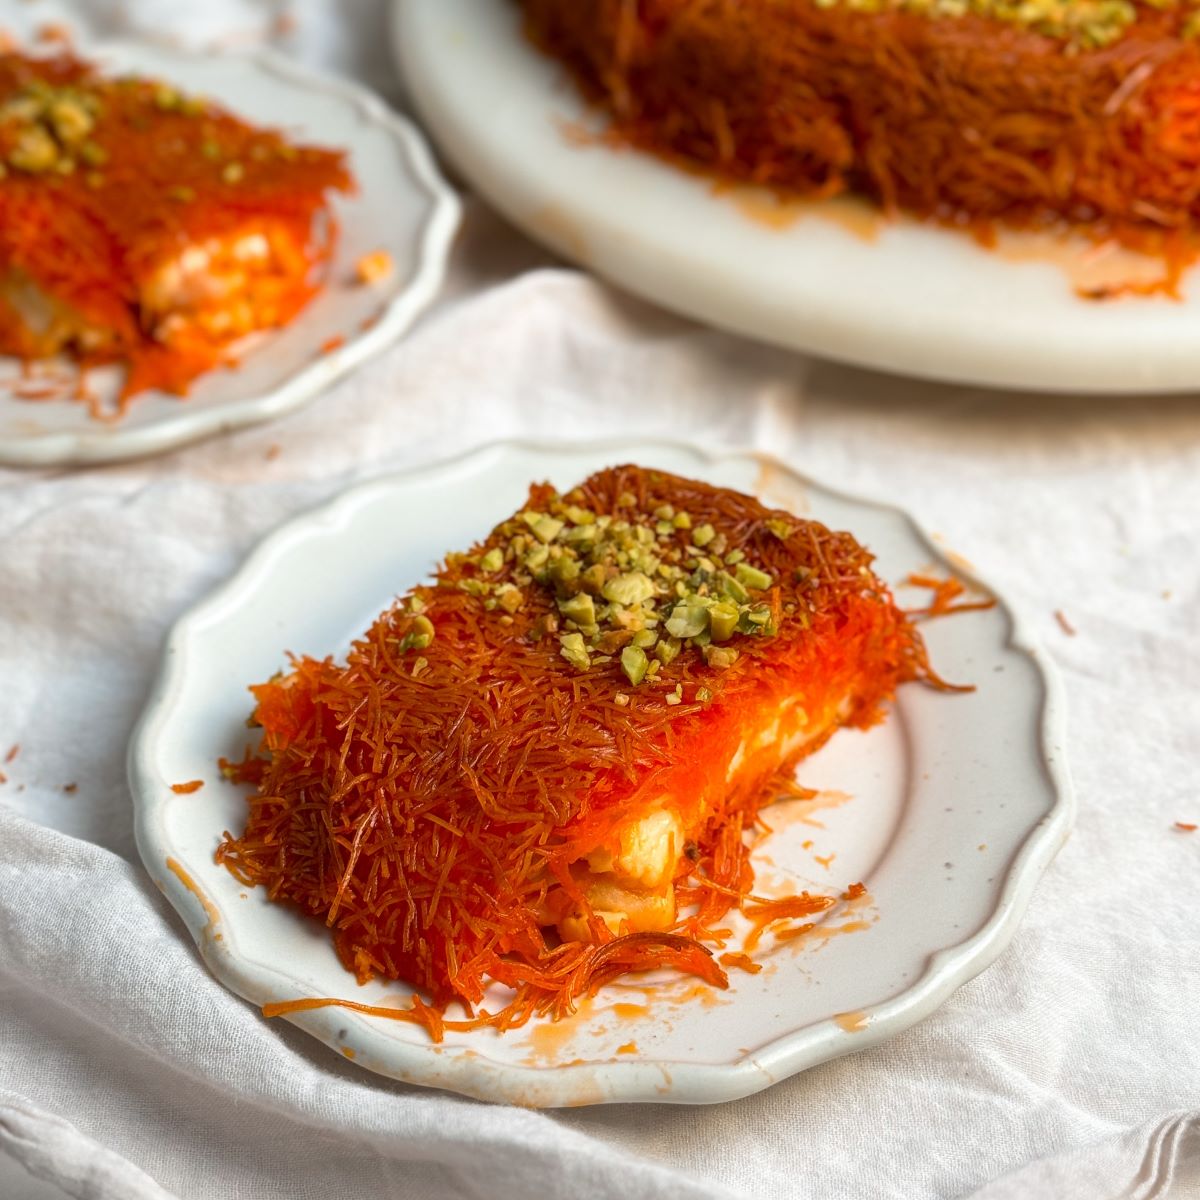
- Shredded Phyllo Dough (Kataifi): These fine, hair-like strands are the secret to Knafeh's iconic crispiness. When baked to a golden hue with butter, they create an irresistible crunchy exterior.
- Gooey Cheese Filling: A unique sweet cheese blend forms the warm, stretchy core, providing a creamy contrast to the crisp pastry.
- Aromatic Simple Syrup: Drenched after baking, this sweet elixir, often infused with rose water or orange blossom water and a hint of lemon, provides moisture and a fragrant finish.
- Crushed Pistachios: The vibrant green pistachios add not only a pop of color but also a subtle nutty crunch and an authentic flourish.
While there are regional variations across the Middle East, Turkey, and Greece – some featuring semolina dough instead of phyllo, or a pudding layer in the filling – our focus today is on the popular "kunafa khishna" style. This version utilizes the shredded phyllo for that distinct texture and a pure cheese filling, delivering the ultimate ooey, gooey, sweet, and crunchy sensation. It’s a dessert that’s rich, satisfying, and utterly delightful – truly a sinfully delicious treat that's hard to resist.
The Magic Behind Easy Knafeh Kunafa: Simplicity & Speed
Despite its impressive appearance, one of the most wonderful aspects of Knafeh is its surprising simplicity. Many home bakers shy away, intimidated by its exotic name or the delicate nature of phyllo dough. However, an easy knafeh kunafa recipe breaks down the process into remarkably manageable steps, making it perfect for both novice and experienced cooks. The preparation requires minimal active time, often just 15-20 minutes, especially if you prepare the simple syrup in advance.
The beauty lies in the straightforward assembly: melt, shred, press, layer, bake, and drench. Each component is uncomplicated, and when brought together, they create a dessert that looks far more intricate than it actually is. The true reward comes when you slice into the warm pastry, revealing an incredible, irresistible cheese pull that will undoubtedly earn gasps of admiration from your guests. It’s a dessert that perfectly balances impressive presentation with practical execution, proving that gourmet doesn't have to mean difficult.
Essential Ingredients for Your Easy Knafeh Kunafa
Gathering the right components is the first step to crafting your perfect Knafeh. While some traditional ingredients might be specific to Middle Eastern markets, we'll provide accessible alternatives to ensure your easy knafeh kunafa experience is smooth and successful.
- Kataifi Dough (Shredded Phyllo): This is non-negotiable for the classic Knafeh texture. You'll find it in the frozen dessert section of most Middle Eastern or international grocery stores. Remember to thaw it completely in the refrigerator overnight or at room temperature for a few hours before use.
- Butter or Ghee (Unsalted): This is crucial for coating the phyllo strands, ensuring they bake up golden brown and incredibly crispy. Ghee, clarified butter, offers an even richer, nuttier flavor and superior browning, making it an excellent choice if available.
- The Cheese Filling: Traditionally, Knafeh uses specialty cheeses like Akkawi or Nabulsi, which are unsalted and melt beautifully. For an easy knafeh kunafa at home, accessible and delicious substitutes include:
- Low-moisture Mozzarella: This provides that iconic stretchy, gooey pull. Choose a fresh, unsalted variety if possible.
- Ricotta Cheese: Adds a creamy texture. You can blend it with mozzarella for a balanced taste.
- Mascarpone: Offers a richer, slightly tangy creaminess when mixed with other cheeses.
- Sweet Cheese Blends: A common and excellent solution is to combine mozzarella with a softer, milder cheese like ricotta or even cream cheese (in small amounts) for the best texture and flavor. The key is a mild, meltable cheese.
- Simple Syrup (Ater or Attar):
- Granulated Sugar & Water: The base of your syrup. You can adjust the sugar content slightly to your preference, making it less sweet if desired.
- Lemon Juice: A squeeze of lemon juice prevents the syrup from crystallizing and adds a bright counterpoint to the sweetness.
- Rose Water or Orange Blossom Water: These fragrant extracts are the soul of the syrup, imparting that distinctive, intoxicating Middle Eastern aroma. Choose one or a combination for a truly authentic touch.
- Crushed Pistachios: For garnish. They add beautiful color, a lovely crunch, and an authentic flavor profile.
Step-by-Step Guide to Your Delicious Easy Knafeh Kunafa
Ready to create magic? Follow these simple steps to bring this irresistible dessert to life:
1. Prepare the Aromatic Simple Syrup (Ater)
- In a small saucepan, combine sugar, water, and lemon juice.
- Bring the mixture to a boil over medium-high heat, stirring until the sugar dissolves.
- Reduce heat to low and simmer for 5-7 minutes until the syrup thickens slightly. It should be viscous but still pourable.
- Remove from heat and stir in the rose water or orange blossom water.
- Set aside to cool. The syrup should be warm or at room temperature when poured over the hot Knafeh.
2. Prep the Kataifi Dough
- If your kataifi dough is frozen, ensure it's fully thawed.
- Carefully separate the strands of phyllo dough. You want them as individual as possible. You can gently pull them apart or even snip them into shorter pieces (about 1-2 inches long) with kitchen shears for easier handling and a more uniform texture.
- Melt the unsalted butter or ghee.
- In a large bowl, pour the melted butter/ghee over the shredded phyllo dough. Use your hands to thoroughly coat every strand, ensuring there are no dry spots. This step is critical for a golden, crispy Knafeh.
3. Assemble the Knafeh Layers
- Generously grease your baking dish (a 9-10 inch round pan or a rectangular dish works well) with butter or ghee.
- Take about half of the buttered kataifi dough and press it firmly and evenly into the bottom of the prepared dish. Make sure it forms a compact layer, extending slightly up the sides if desired.
- Spread your chosen cheese filling evenly over the kataifi layer. Leave a small border (about half an inch) around the edge to prevent the cheese from oozing out during baking.
- Carefully place the remaining buttered kataifi dough over the cheese layer, gently pressing it down to cover the cheese completely without compacting the cheese too much.
4. Bake to Golden Perfection
- Preheat your oven to 350°F (175°C).
- Bake the Knafeh for 30-45 minutes, or until the top and sides are deeply golden brown and crispy. Keep an eye on it to prevent burning.
- For an extra crispy top (and bottom!), you can carefully invert the Knafeh onto another serving platter or pan halfway through baking, or simply after baking. Many prefer to bake the bottom until very crispy, then carefully flip it onto a serving dish and pour syrup.
5. Drench and Garnish
- Immediately upon removing the hot Knafeh from the oven, pour the warm or room-temperature simple syrup evenly over the entire surface. The hot Knafeh will readily absorb the syrup.
- Let the Knafeh sit for 5-10 minutes to fully absorb the syrup.
- Generously sprinkle with crushed pistachios.
- Serve warm for the ultimate gooey cheese experience and an impressive cheese pull!
Tips for Knafeh Success
- Don't Skimp on the Butter: The butter isn't just for flavor; it's essential for achieving that characteristic golden crispness. Ensure every strand of kataifi is coated.
- Press Firmly: A compact bottom layer of phyllo prevents the cheese from sticking and ensures a sturdy base.
- Cheese Matters: Opt for mild, low-salt, and good-melting cheeses. A blend often yields the best results. If using a slightly saltier cheese, you might want to soak it in water for a bit to draw out excess salt, though this is less necessary with accessible options like mozzarella.
- Syrup Temperature: A common rule is hot pastry + warm/room temperature syrup. This allows for optimal absorption without making the pastry soggy.
- Make Ahead: The simple syrup can be made days in advance and stored in the refrigerator. You can also assemble the Knafeh (without baking) a few hours ahead and keep it refrigerated, baking just before serving.
- Explore More: To truly Unlock Authentic Knafeh: Simple Steps for This Sweet Cheese Pastry, experiment with different syrup infusions or toppings.
Why Your Kitchen Needs This Easy Knafeh Kunafa
Adding an easy knafeh kunafa to your dessert repertoire is more than just learning a new recipe; it's opening a door to a new world of flavor and texture. It stands proudly Beyond Cheesecake: Easy Knafeh For Your Next Sweet Cheese Craving, offering an exciting alternative that is both familiar in its sweetness and delightfully exotic in its presentation.
This dessert provides an unparalleled sensory experience: the delightful crunch of the kataifi, the warm, stretchy embrace of the cheese, and the perfumed sweetness of the syrup. It's a dish that guarantees to impress, turning wary glances into expressions of sheer joy. Whether you're hosting a dinner party or simply craving a unique sweet treat, Knafeh is your answer. It's an adventure for your taste buds, accessible and enjoyable for every home cook.
So, cast aside any apprehension and embrace the simplicity of creating this phenomenal Middle Eastern classic. With this guide, you're not just making a dessert; you're crafting an unforgettable experience. Dive in, enjoy the process, and prepare to savor every ooey-gooey, crispy, sweet bite of your homemade Knafeh. Your culinary journey awaits!
